Posts

Data Migration in Dynamics 365

Image
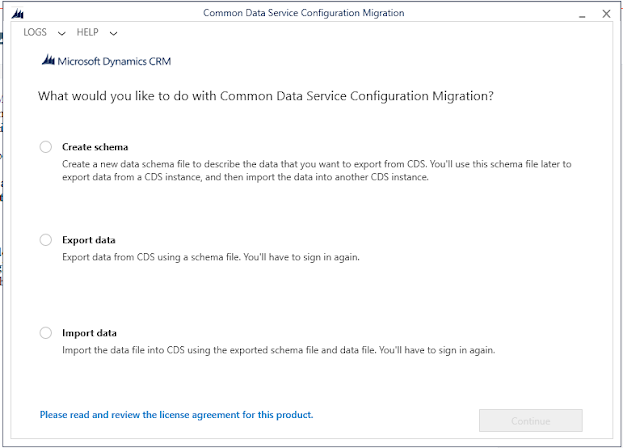
Data Migration: -   It is a one-time activity when we can able to move the data from one environment to another environment (i.e one server to another server) that is called as Data Migration. Link to download sdk:    sdk In this above link you will get a zip file which contains Plugin registration tool and Data Migration tool. After downloading the zip file un-zip it to a folder. ConfigMigration => DataMigrationUtility.exe  Open the tool We have 3 steps for data migration Create Schema Export data Import data Firstly we need to create the Schema for data import, so select create schema Login with your CRM credentials Select the Environment that you want to import the data from Select the Entity and fields that you want to export Click on Save and Export Now it will ask you to Do you want to export the data then click on Yes. On the next window you can select the location where the data should export. Now Export data. then you will get the confirmations in the window. Now check in

How to create an Azure AD(Active Directory) and create an application to connect Dynamics 365 from console application

Image
 Steps: - Video link :  How to connect console application to connect Dynamics 1. Open Azure Portal 2. Login with your CRM login Credentials 3. open Microsoft Entra ID 4. click App registrations. 5. select New registration 6. After Registering the application, you will get the Application Id (Client Id)..etc save the details. 7. Select App Permissions, click on Add permission, then select Dynamics 365. 8. Grant permissions to the created permissions. 9. Select Client & secrets, then click on New client secret, and provide the appropriate details. 10. After creating a secret you should copy the secret value, otherwise you cannot copy it later. 11. Open Power portal administrator, login with your CRM credentials. 12. Select your required environment, open users. 13. select application users, then select +New app user. 14. click on "Add an app", then select the created Azure application. 15. Provide the security role as System administrator, because it has the highest privil

Task - 4

 Call the Plugin using JavaScript and set the Approved Status Call the plugin using JavaScript and set the approved status. User Story: - When we click on the Approve button in the student Entity record then the status field value in the student record should become Approved. Sudo code: - Create an Approve button for custom entity using Ribbon work bench in XRM Toolbox.   Create a solution for custom entity ribbon work bench.   Add the required entity meta data to the solution.   Use this solution in Ribbon workbench to create buttons and publish it in the entity. Create an Action to use it as a Message in Plugin. Create a plugin. In the plugin retrieve the EntityReference to a variable. Define Entity variable by getting values of Entity Id and Logical name from EntityReference. null check the entity. Set the OptionSet Attribute value to the Approved value. Use the service.Update(Entity) to update in the server. Register the Plugin using the Plugin registration tool and set the Mess

Task- 7 _ Removing and Adding Options to Option Set in Dynamics 365

Image
 Removing and Adding Options to Option Set Create a case DMPS type yes or no field, if yes then show case origin only DMPS or show other options except DMPS. User Story: - Create a DMPS two-option set field with yes or no options in the case entity, based on the DPMS field value if it is Yes then in the origin option set it should only contain the DMPS option, if it is No then it should contain the remaining options except DMPS. Sudo code: - Create a DPMS two-option field with YES or No as options. Create a JavaScript file with a function to update the option set options. In the JavaScript code first, retrieve the DMPS field value, it will return true or false. Get all the options by the getOptions method. Use the foreach loop on the retrieved options then remove the each option from the origin option set by the removeOption method. If DMPS is true then add the DMPS option to the origin option set. If DMPS is false then add the remaining options to the origin option set Create a JavaSc

Task-5 _ Call the Powerautomate on click on the approve button and Send an Email

Image
  Call the Powerautomate on click on the approve button and Send an Email Call the Powerautomate on click on the approve button and send mail to parents. User Story: - When we click on the Approve button in the student Entity record then a confirmation email should be sent to the respective student, do this operation using powerautomate. Sudo code: - Create an Approve button for custom entity using Ribbon work bench in XRM Toolbox.   Create a solution for custom entity ribbon workbench.   Add the required entity meta data to the solution.   Use this solution in Ribbon workbench to create buttons and publish it in the entity. Create a Power automate for that particular entity, with triggering point as a HTTP Request. Retrieve the email to a variable from HTTP Request body. Check the null condition for email. If email is present then send email. If email is not present then stop the power automate. After saving the power automate we will get the URL form triggering the power automate.

Task-10

Image
User Story: - Create an HTML page and show the account mark in red color font for city equal to dallas, show in left navigation form. Detailed Explanation: - We should create an HTML page and show it left navigation, in that HTML page we should show the list of accounts available in the CRM and accounts with dallas as city should be in red color font. Sudo Code: - Create an HTML page, and inside the <script> tags provide the JavaScript code. In this JavaScript code, I should retrieve the list of account names with city names in the CRM by using Xrm.WebApi.online.retrieveMultipleRecords  method, we need to provide "parent" in front of this method to access it from the parent HTML page context. You can get this code by using REST builder. Using for loop for each record, you should create an HTML paragraph element with textContent as the name of the account record. Now check the condition if the city name equals Dallas check for lower and upper cases using ToLower(). If